
Create a workspace
A project holds the whole picture. A workspace is the slice of it one team works on: the tables they have pulled into scope, the canvas they lay those tables out on, and the validation findings they clear before a build. Every project is born with one workspace named Default, and you add more when a piece of work deserves a scope of its own.
Workspaces are also where metadata enters DeltaVault. Import metadata is a workspace action, so the tables an import creates land in the workspace you started from.
Create a workspace
Section titled “Create a workspace”Creating a workspace needs the editor role and a feature branch. On the main branch every write action is disabled, so switch to a branch first.
- Open the project and select the Workspaces tab. The grid lists the project’s workspaces with their name, description, and created date.
- Click New. The Create workspace dialog opens on its first step.
- Enter a Workspace name. It is the only required field, and Next stays disabled until you fill it. Add a Description if the scope needs explaining.
- Click Next to reach Pick tables. Choose the tables this team needs from the project’s table tree. A running count below the tree tells you how many you have selected.
- Set Include related if you want lineage neighbors pulled in alongside your picks. Include source-related and Include target-related each offer Off, 1-level, and All. Include reference-related offers Off and 1-level.
- Click Next to reach Confirm. The summary repeats the name, the description, and the branch your edits will flow into, then previews how many tables you picked directly and how many related tables come with them. Untick any related table you do not want.
- Click Create. DeltaVault confirms with Workspace created and opens the new workspace on its Details tab.
An empty workspace is a valid choice. If you pick no tables, the Confirm step says so and tells you that you can add scope from the canvas later.
Adding a table to a workspace also anchors it to the project. Workspace membership is the narrower scope, project membership the wider one, and you get both from a single add.
Bronze tables are not created automatically for source tables you add by hand. Importing metadata creates the full chain from source through persistent staging.
Sources and Targets
Section titled “Sources and Targets”DeltaVault splits every table tree into Sources and Targets, so you can see at a glance which tables the work consumes and which it produces. The split comes from the connection a table belongs to: a connection is marked as a source connection, as a target platform connection, or as both, and its tables inherit that position.
You meet the same two roots wherever tables are listed for a scope: on the organization-wide Catalog, on a project’s Catalog, and on a workspace’s Catalog. Inside a workspace the tree is pruned to that workspace’s working set, and connections, catalogs, and schemas left with nothing in scope are hidden rather than shown empty.
Selecting a table opens its detail tabs. Selecting a connection, catalog, or schema instead opens a summary pane with a details form and a tables grid scoped to what you selected.
The workspace tabs
Section titled “The workspace tabs”A workspace opens with three tabs, and the workspace name is the page title above them.
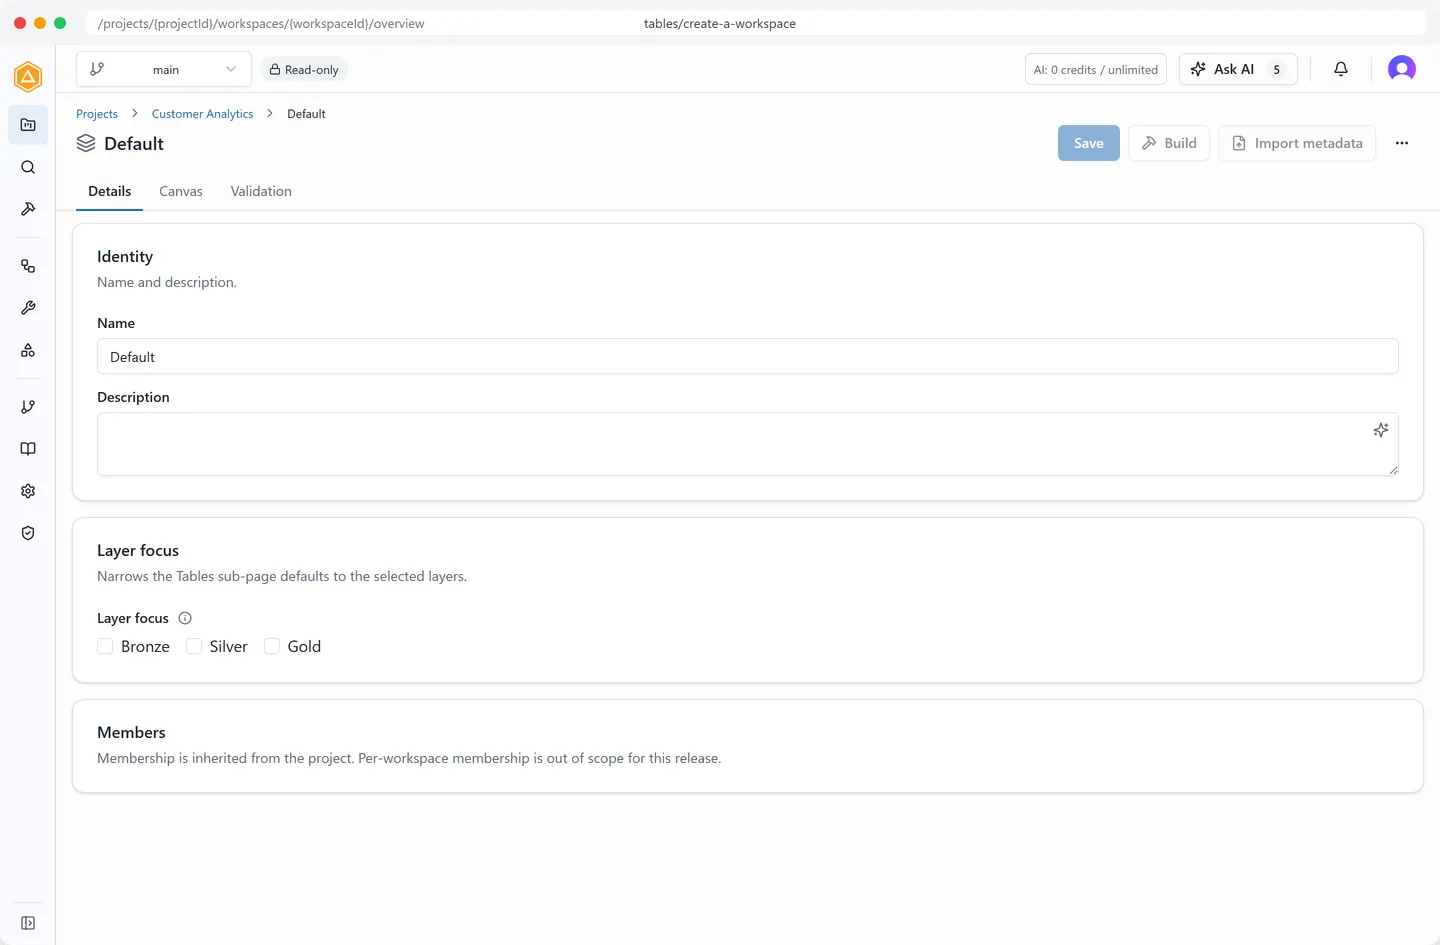 Details, Canvas, and Validation, with Import metadata in the header beside Build.
- Details is the workspace’s own record: its Name, its Description, and a Layer focus choice of Bronze, Silver, and Gold that narrows what the table surfaces show by default. Membership is inherited from the project rather than set here. Save and Remove workspace sit in the page header.
- Canvas lays the workspace’s tables out as a graph. Switch between Lineage and Relationships with the view mode control. A workspace with no tables yet offers Import metadata from the empty canvas.
- Validation runs the branch’s validation rules and lists what they find.
Catalog, Models, and Entities also belong to a workspace, but you reach them from the left rail rather than from these three tabs. A workspace has three tabs; it does not have only three surfaces.
Import metadata
Section titled “Import metadata”Import metadata is where new metadata enters the catalog. It is published on the surfaces where scope is being changed rather than read:
- A workspace’s header, while the Details tab is active.
- A workspace’s Catalog page.
- A project’s header, on its Details and Workspaces tabs.
- A project’s Catalog page.
It is absent from the workspace header on Canvas and Validation, which are reading surfaces, so switch to Details if you cannot see it. On a project it targets that project’s default workspace, and it stays disabled with the note Create a workspace first until the project has one.
It opens a dialog that asks how you want to bring metadata in. Which options appear depends on the project’s source:
- Agent discovery discovers live tables directly from the project source through a paired local agent. It needs a verified connection and a record source on the project, and stays disabled until it has both.
- Delimited upload imports a connection’s tables from a CSV or SQL file. It is always available, and it is the only option that asks for its inputs in the dialog itself.
- File discovery discovers table and column metadata from a sample file in the source’s file storage.
- Cloud discovery discovers entities directly from the source cloud service, with no local agent involved. It needs a verified cloud connection.
Pick one and click Next. Agent discovery and Cloud discovery start a run and take you straight to the import review page. File discovery opens the file upload wizard. Delimited upload asks for its inputs first.
While you are working on an import, the workspace tabs and the Import metadata action step aside, so the header carries only that import’s own actions until you finish or cancel it.
Add tables to an existing workspace
Section titled “Add tables to an existing workspace”Add tables on the workspace Catalog page opens a picker over the project’s tables. Filter, tick what you need, and use the same Include related controls to pull in lineage neighbors. Tables already in the workspace appear disabled.
To take a table back out, select it and choose Remove from workspace. Removal never deletes the table’s metadata. It takes the table out of this workspace’s working set, and you can add it again whenever you want it back.
Validate before you build
Section titled “Validate before you build”Validate now on the Validation tab checks every table, column, entity, and relationship on the branch against the validation rules, then shows you the findings that belong to this workspace. Filter them by severity, and use the Blocking chip to see only the ones that stop work. Model health sits above the list.
A blocking finding refuses three things: committing a branch, building a project, and rendering templates. When one does, DeltaVault shows Blocked by validation findings and lists what to fix. There is no way to accept a blocking finding and carry on: fix it, or ask a platform administrator to retune the rule behind it.
Two empty states read alike and mean opposite things. “This branch has not been validated yet” means no run has happened. “No findings” means a run happened and every rule passed.
Delete a workspace
Section titled “Delete a workspace”Remove workspace is on the Details tab, beside Save. Deleting a workspace removes its model assignments and its table links. The tables and models themselves stay in the catalog, so nothing is deleted from it. A project’s Default workspace cannot be deleted directly.